
Products
Products
This page allows you to view, manage, and search for all products in your inventory. It provides essential information and tools to help you efficiently handle your product listings.
Search for products in 2 ways:
- By entering the product barcode, SKU, or supplier code

- Using advanced search function.

Add a condition by selecting the desired field.

then selecting the condition

then enter a value.

as well as filter the products by their tags

Product Tag is a label assigned to a product to categorize or identify it based on specific attributes and characteristics
To add new product tag, go to ” Products > Product tags”
View the products as a list or simply unselect the check box to view them as cards

How to Create a New Product
Check out the tutorial below:
Selecting the Parent Category:
You must select the Parent Category that you have entered in the products > Categories page.
You can add a new category on the same page by typing the category name and clicking on the “Add New” button.


Selecting the Sub-category:
Select the subcategory related to the chosen main category.
You can add a new subcategory on the same page by typing the subcategory name and clicking on the “Add New” button.


Product Name:
Enter the product name and product foreign name.
Product Type:
Choose the type of product is it Retail or Service.
Product Expiry:
If the product is expirable, you will have to enter the expiration date.


Selecting the Unit of Measurement Category:
All units of measurement added in the Products > Units of Measurement page.
Select the unit of measurement category you have previously added.

Adding a unit of measure category from the product creation
If you want to add another unit of measurement just click on “Add Unit.”
Product Reference:
After adding the unit of measurement, you will move to the step of determining whether to add a reference number for the item.

Once you choose to add a reference number, a dropdown list containing all suppliers added in the system will appear. After selecting the supplier, you can enter the reference number for the item.
Product Detail:

The Product type cannot be changed.
The unit of measurement category cannot be changed after it is created.
Product tags can be associated with the product by clicking on the edit button and then, selecting the desired tag from the list.


New product tags can be created for the product from the same page by entering the new product tag and then click on save.
Product Image:
Click on the image to Add a new image.

Click on the Add button to add an image,

Browse and select an image or drag and drop an image in the box, and the system will upload the image.
Click upload to upload the images. or click clear to remove the images. Then click on Save.
Product Remarks:

Write the Desired remarks for the Product, and once Edited click the save button on the Top left of the page.
Product Name:

The product name in the first language and foreign language can be edited.
Product SKU:

The SKU is displayed.
Product Stock:

The base unit’s stock of the product in the current location as well as the stock in the company
Initial Cost: The cost of acquiring a product when it is first purchased or added to inventory.
Initial Cost: The cost of acquiring a product when it is first purchased or added to inventory.
Average Cost: The average cost of a product over time, calculated based on historical purchase prices and quantities.
Adding Barcode and retail price:
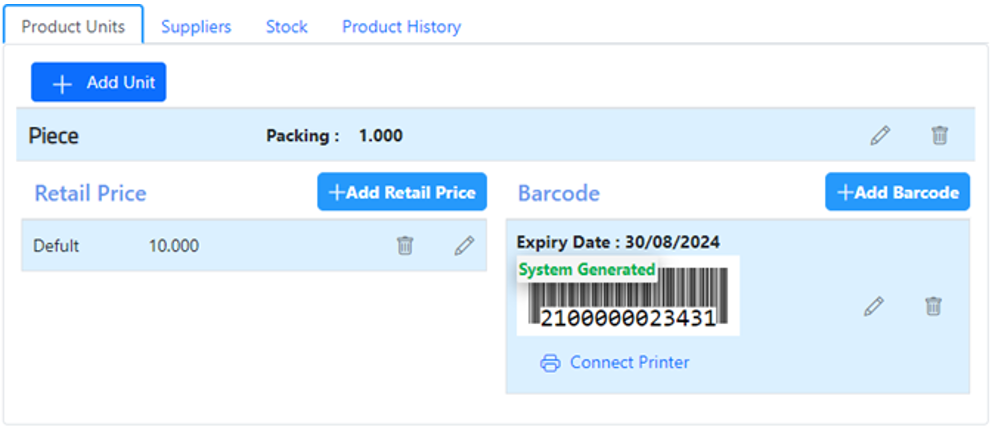
After selecting or adding a new unit, you can now add the barcode for the unit. Enter the retail price for the selected unit.

Enter the price and click save.
The user can enter the specific amount of the retail price based on the policy on whether the tax is inclusive or exclusive.
A new retail price will be created.
If there is Retail price entered. This message will show

Once the user enters the retail price the user can see what the percentage of the profit is. ( Only if there is available cost )
Note: If there is no stock available for this product and the cost is not known, the user can still add the retail price, but the profit percentage will not be calculated or shown.
Barcode:
Each unit of measurement can have a list of barcodes for each location.

Click the add button
When the barcode type is normal:

The user can enter a specific value for the barcode, description in the main language of the company, foreign description in the foreign language of the company, or leave it blank for the system to generate them.
and click save.
when the Barcode type is Scale:

Choose what the barcode should be printed with weight or price. Then click on save
If the product is expirable:

Enter Expiry date.
To edit the barcode.

click on the edit button.

To print the barcode
Select a printer.
If the printer is not connected, then go to the locations report on the locations page in the step tab, and connect the printer.

Enter the number of copies required to be printed.
click on the print button.

Note: Barcodes are only visible/ enabled when the policy allows to show the barcodes in the product detail page
Supplier Tab:
The associated suppliers for the item will be displayed.

Click the “eye” button to view supplier details

The item’s stock across all locations, quantity, average cost, last supplier order, and date will be displayed.

The item’s movement is displayed. The user can select the date, locations, and click the Apply button

Product movement can be printed by clicking on print button:

Click the filter button to apply filters:


The item can be disabled by clicking Edit > Deactivate


Categories
This page allows you to create and manage categories for your products. Categorizing products helps in organizing your inventory, making it easier to locate and manage items
How to add a New Category

Enter the category name and foreign name and category code
Note: Categories that have subcategories (or child categories) cannot be deleted unless all the child categories are deleted first

Units of Measurement
How to add a New Unit of Measurement
By clicking Add, the unit of measurement category can be created by entering the name of the category.

After the Category of the unit of measurement is created, the individual units in each category can be created.

The unit’s name should be at least 3 characters.
The first unit will be the base unit. 1 unit category can only have 1 base unit.
units in 1 category cannot have the same ratio and type combination.
The new units can be of 3 types: base, larger than the base, and smaller than the base.
This Unit category and unit of measurement are used in the products.
Product Tags
The tags that are to be associated with the products can be created here, by simply entering the tag name.
How to Create a New Tag

Edit Information:

To make changes to a record, click on the Edit button. After making the necessary modifications, click on the “Save” button to save the changes.
Once the tags is linked with a product you cannot edit it.

