Settings
Company Profile
General Information:

The Company name should be written in the main language.
Foreign company name should be written in a second language.
Contact Information:

Address should be written in the main language.
Foreign address – the address of the company should be written in a second language.
Enter Phone number, website, mobile number and Unified telephone number
The above fields can be edited and displayed in the printed reports.
To Upload image:

Click on the image.
Then a pop-up dialogue box will appear, user can select to browse or drag & drop the image to be uploaded.
The uploaded image will be displayed in the printed reports.


Legal information:

Enter the Registration and tax registration number and click save on the top right corner of the page.
Localization Settings:

The main currency cannot be changed, it is set in the wizard when the company is created. When the user doesn’t select a currency, the system will take the main currency as the default currency.
Changing the Date format changes the date format in every place it’s used.
Taxation Policy:
The tax can be enabled and disabled:


This is essential for businesses handling multiple currencies
Tax Tab:
- Add Multiple Taxes: Create and manage different tax rates.
- Tax Type: (example: Purchase VAT)
- Label: Name of the tax.
- Percentage: Tax rate in percentage.
- Remarks: Optional notes.
This tab helps you apply the correct taxes easily across transactions.

Locations Tab:

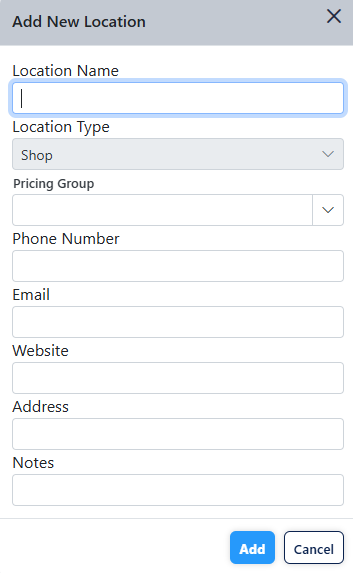
Click on add button to add new location
Note: By default the location type is “Shop“
System Policies

Click on the “system policies” tab to view policies that are applied across the entire company
Check out the tutorial below:
Products Policies

Retail price Is Tax inclusive :
This policy means that the retail price shown for products already includes taxes. Customers see the final price with tax included.
Price on Barcode is Tax inclusive:
When this is enabled, the price printed on the barcode label includes tax. This helps ensure the price scanned at checkout matches what’s shown on the product.
Scale Barcodes are printed with price:
General Policies
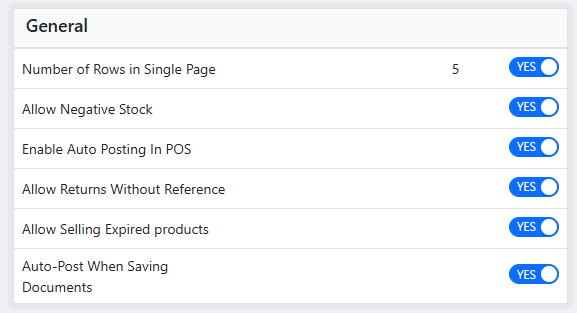
Number of Rows in Single Page:
This setting determines how many rows of data (like items in a list) are displayed on a single page. Adjusting this can help with viewing large records or reports. If your internet speed is slow, you can decrease the number of rows to improve loading times.
When enabled, the system allows you to process sales even if the stock goes negative, you can sell items even if inventory shows you don’t have enough in stock.
This automatically posts transactions in the POS system without the need for manual recording. It streamlines the process by automatically finalizing transactions.
Allow Returns Without Reference:
When enabled, users can process returns without the need to retrieve the original sale or purchase, allowing you to either retrieve by reference or create a new return directly.
Allow Selling Expired products:
This allows the sale of products even if they have passed their expiration date
Auto-Post When Saving Documents:
When this policy is enabled, documents are automatically posted as soon as they’re saved. This eliminates the need to manually click “save” and then “post,” making the process quicker and more efficient.
POS profiles and Policies
Click on the “POS policies” tab to view policies that are applied on POS, all policies based on your current location, it also let you customize your policies to suit your business needs.

Write a caption
To filter the data, enter the desired value in the column you wish to filter. Once entered, press the “Enter” key, and the system will apply the filter based on the provided value.
Pos Profile for the specific location
Note: Please ensure that you click on the “Save” button located at the top right corner of the page whenever making any changes on this page. This will ensure that your modifications are properly saved.

Policies for the POS are as follows:
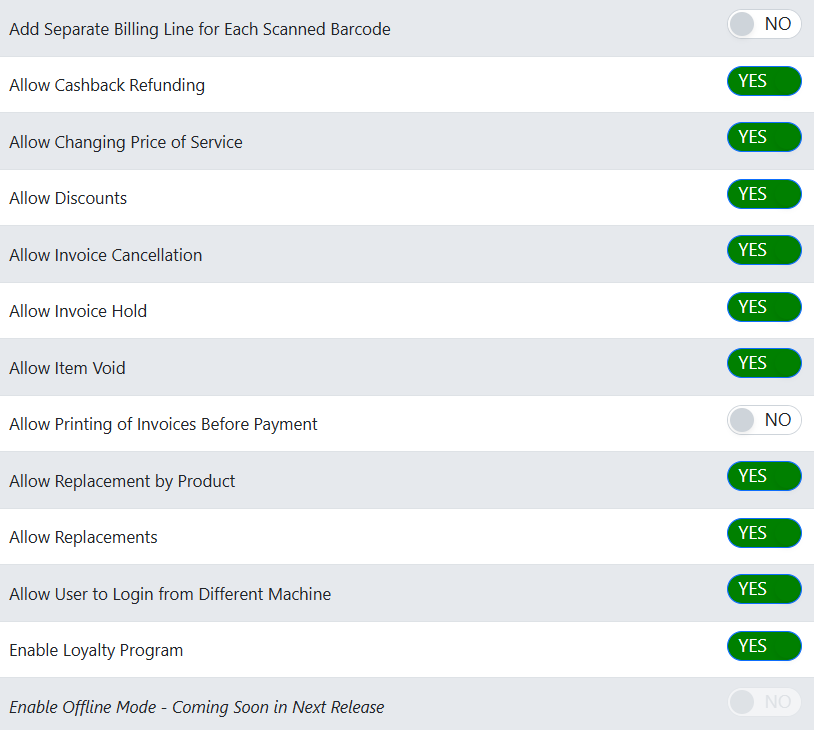
By default, all of the policies are disabled unless you enable them.
Note: This excludes Offline Mode and Update Inventory Stock, which are enabled by default.
Add Separate Billing Line for Each Scanned Barcode
If you enable this policy, each scanned barcode will create a new line on the receipt. For example, if you initially buy 2 water bottles and 1 juice, and then later add 2 more water bottles, the cashier will create a new line for the additional water bottles on the receipt, Another example:
If you enable this policy, each scanned barcode will create a new line on the receipt
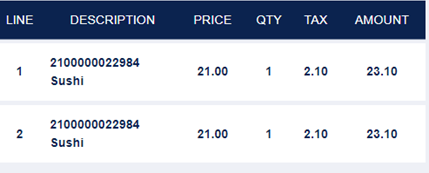

If you do not choose this policy, the additional items will be added to the existing line for sushi, increasing the quantity from 2 to 4 on the same line. This means the total quantity will be updated on the existing line rather than creating a new line.
Allow Cashback Refunding
When the policy is enabled, the system permits the execution of cash-back transactions utilizing the balance available in the credit note.
Allow Changing Price of Service
This policy permits the user to modify the price of a service item during the transaction at the POS. For example, if a service charge is listed as 50 BD, this policy allows the user to change it to a different amount, such as 45 BD or 55 BD, based on customer negotiations or discounts. If this policy is not enabled, the service cannot be changed during the transaction
Allow Discounts
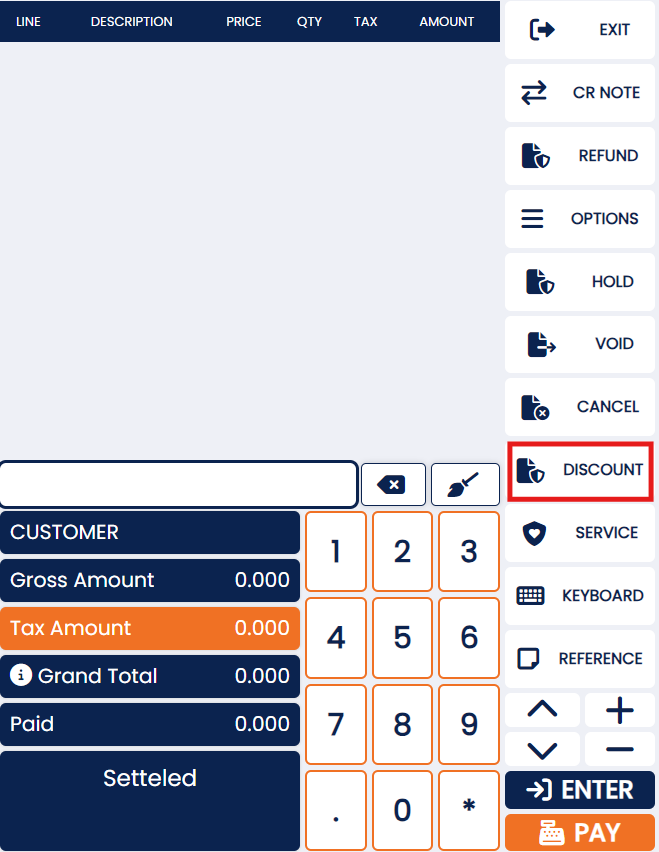
When the policy is enabled, the system grants the user the authority to apply discounts to invoices. This functionality enables the user to reduce the total amount payable on an invoice by a specified percentage or amount, effectively providing a discount to the customer. The discounts can be applied to individual line items or to the overall invoice total, depending on the system’s configuration and the user’s discretion. This feature can be valuable for promoting sales, managing customer relationships, or accommodating special pricing agreements.
Allow Invoice Cancelation
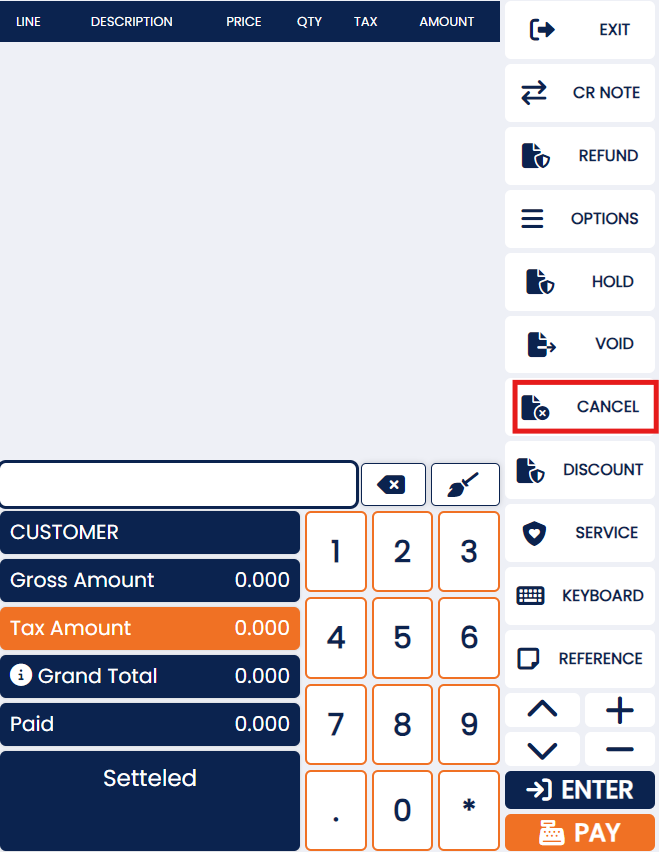
When the policy is enabled, the system grants users the ability to cancel invoices within the billing page. This functionality allows authorized users to void or nullify invoices that have been generated or issued. By permitting invoice cancellations, the system provides flexibility and control to rectify errors, resolve disputes, or accommodate changes in circumstances. This feature ensures that users can effectively manage and maintain accurate records of invoicing transactions within the system.
Allow invoice Hold

When the policy is enabled, the system allows users to place an invoice on hold, deferring its processing, and providing the capability to retrieve and resume it at a later time. This functionality enables users to temporarily suspend an invoice, typically for various reasons such as additional verification, awaiting additional information, or pending customer approval. By permitting the holding of an invoice, the system offers users the flexibility to manage their invoicing workflow effectively and accommodate specific business requirements or customer preferences.
Allow Item Void

When the policy is enabled, the system allows users to selectively cancel or void specific items of their choice within an invoice. This functionality provides users with the flexibility to remove or invalidate individual items from an invoice, while keeping the remaining items intact. By permitting item-level cancellations or voids, the system enables users to accurately reflect any changes, corrections, or adjustments required for a particular invoice. This feature enhances the user’s control over invoice management, ensuring precise and granular control over the content and details of each transaction.
Allow Printing of Invoices Before Payment
You can check out the tutorial below:
When the policy is enabled, the system grants users the ability to print invoices prior to making payment. This functionality allows users to generate a physical or digital copy of the invoice document for reference, record-keeping, or sharing purposes, even before the payment process is completed. By permitting invoice printing before payment, the system facilitates efficient documentation and enables users to have a tangible record of the transaction, which can be useful for internal processes, customer communication, or compliance requirements.
Allow Replacement by Product
This policy lets users replace one product with another during the transaction. If enabled, cashiers can swap items based on customer requests.
Allow Replacements

When the policy is enabled, the system allows the utilization of credit notes as a valid payment type within the billing process. This functionality enables customers to apply their available credit notes towards the outstanding balance of their invoices. By permitting credit notes as a payment type, the system facilitates seamless transactions and provides customers with the flexibility to use their credit balance as a form of payment, reducing the amount owed and simplifying the payment process. This feature can be beneficial for managing customer accounts, providing refunds, or honoring store credit.
Allow User to Login from Different Machine
When the policy is enabled, the system allows users to log in to any machine, irrespective of the specific machine they are assigned to, provided that their shift is currently open. This functionality grants users the flexibility to access the system from any available workstation or device within the network during their active shift. By permitting cross-machine logins, the system facilitates user mobility and enhances operational efficiency, enabling users to seamlessly transition between different machines without any restrictions, as long as their shift is active.
Enable Loyalty Program
When the policy is enabled, the system offers customers a specific percentage of the price as points that can be accumulated and redeemed at a later time. This functionality allows customers to earn rewards or loyalty points based on their purchases. These points can be accumulated over time and used to obtain discounts, free items, or other benefits during subsequent transactions. By implementing this policy, the system incentivizes customer loyalty and encourages repeat purchases, fostering a positive customer relationship and enhancing the overall shopping experience.
Enable Offline Mode
When the policy is enabled, the system allows the Point of Sale (POS) system to operate in offline mode. This functionality enables the POS system to continue functioning even when there is no active internet connection or when connectivity is temporarily lost. In offline mode, the system can process sales transactions, generate receipts, and perform other essential functions without relying on real-time communication with external servers or databases.
By permitting offline mode, the system ensures uninterrupted operation and enables businesses to continue serving customers even in situations where internet connectivity is limited or unreliable. Once the connection is restored, the offline transactions can be synchronized with the central server or database to update inventory levels and reconcile the sales data.
Technical Configuration Settings for the point-of-sale layout
You can check out the tutorial below:

Display the native currency’s denominations within the payment dialogue
When the policy is enabled, the system allows users to enter the payment amount in the payments section using either the numeric pad or the buttons that display the native denominations. This functionality provides users with flexibility in selecting their preferred method of inputting the payment amount.
Users can utilize the numeric pad to manually enter the specific amount using numerical digits, allowing for precise payment values. Alternatively, they can utilize the buttons that display the native denominations, typically representing common currency values or predefined amounts. This feature simplifies the payment process by offering convenient options for users to input the payment amount based on their preference or ease of use.
Showcase an advanced payment Dialogue
When the policy is enabled, the system provides an enhanced payment dialogue that includes several features. These features include displaying the accepted input amount in foreign currencies, the accepted payment types, a comprehensive record of all payment transactions, as well as the paid and unpaid balance.
In this mode, the system allows users to input the payment amount directly in foreign currencies, simplifying transactions for customers using different currencies. Additionally, the system displays the accepted payment types, giving customers a clear understanding of the available payment options.
Furthermore, the system maintains a detailed record of all payment transactions, ensuring accurate tracking and reporting. It also provides visibility into the paid and unpaid balance, allowing cashiers to easily determine the remaining amount to be paid.
On the other hand, when the policy is disabled, the payment dialogue is simplified. It only displays the available payment types, and the cashier is required to manually enter the payment amount.
Enabling the policy enhances the payment process by offering more features and information to both customers and cashiers, promoting transparency and efficiency in recording and managing payment transactions.
Invoice Designer

Print Barcode on Invoice
This policy enables printing the barcode of each item directly on the invoice. This allows for easy scanning and tracking of products when processing returns or managing inventory.
Print Company Logo on Invoice
This policy allows the company’s logo to be included on invoices. It helps in branding and adds a professional touch to the documents provided to customers.
Print Customer Signature Field on Invoice
This policy includes a designated area for the customer’s signature on the invoice. It allows customers to sign the invoice as a confirmation of receipt or approval, adding an additional layer of verification.
Print Native and Foreign Description on Invoice
When the policy is enabled, the system includes both the original description and the translation of the description on the printed invoice. This functionality ensures that customers receive a comprehensive and multilingual representation of the product or service being invoiced.
By printing the original description, the system captures the product details as provided by the manufacturer or the original source. Simultaneously, including the translated description allows customers who may not understand the original language to comprehend the information accurately.
This feature caters to businesses operating in multilingual environments or serving customers from diverse linguistic backgrounds. It enhances communication and clarity, enabling customers to understand the products or services listed on the invoice, regardless of their preferred language.
Print QR Code on Invoice
When the policy is enabled, the system generates and prints a QR code on the invoice that is compliant with the ZTCA (Zakat Tax and Customs Authority) regulations. This QR code contains the necessary information and data required by the ZTCA for zakat tax and customs purposes.
By including the compliant QR code on the invoice, the system ensures adherence to the regulations set forth by the ZTCA. This feature facilitates efficient and accurate processing of zakat tax and customs-related information by providing a standardized and easily scannable code.
The QR code may contain details such as the taxpayer’s identification, transaction information, tax calculations, or any other relevant data required by the ZTCA. It allows authorities to scan and process the information electronically, streamlining the zakat tax and customs procedures.
Including the compliant QR code on the invoice helps businesses comply with regulatory requirements and simplifies the reporting and processing of zakat tax and customs-related matters.
Print Voided Lines on Invoice
When the policy is enabled, the system includes the details of voided items on the printed invoice. This functionality ensures transparency and provides a clear record of any items that have been voided or removed from the original invoice.
By printing the details of voided items, the system displays information such as the item name, quantity, price, and any other relevant details that were associated with the voided item. This allows customers and businesses to understand which specific items were removed from the invoice and the impact it has on the overall transaction.
Including voided item details on the invoice enhances accuracy and accountability. It provides a comprehensive view of the invoicing process and allows for proper documentation and reconciliation of any changes made to the original invoice.
This feature is particularly useful in scenarios where customers or businesses require a complete history of the transaction, ensuring transparency and facilitating proper record-keeping.
Shift Policies

Check out the tutorial below:
Allow Opening shift from the POS
Allows users to open their shift directly from the POS system, setting an initial cash balance and starting transactions for their shift.
Perform User Funds Reconciliation Prior to Closing User Shift
When the policy is enabled, the system prevents the user from closing their shift until the funds have been reconciled. This means that the user is required to ensure that the cash and other payment methods match the recorded sales and receipts before they can close their shift.
Reconciliation involves verifying that the total amount of cash and other payment types received matches the total amount of sales recorded in the system. It ensures that all transactions are accurately accounted for and helps identify any discrepancies or errors in the cash handling process.
On the other hand, when the policy is disabled, the system allows the user to close their shift without requiring the funds to be reconciled beforehand. In this case, the reconciliation process typically takes place during the generation of the Z report, which provides a summary of the day’s sales and transactions.
Enabling the policy ensures that accountability and accuracy are maintained by requiring funds reconciliation before the shift is closed. This helps prevent potential discrepancies and promotes proper financial management.
Allow Opening Shift From the POS
Enables users to start their shift from the POS system, allowing for immediate access to register functions and starting balance.
Perform User Cash Handover Prior to Closing User Shift:
Requires users to complete a cash handover process before closing their shift, ensuring that all cash is accounted for and transferred properly.
Conduct Cash handover Based on Currency Denominations
When the policy is enabled, the system presents the total amount in terms of denominations rather than as a numerical value. This means that the system displays the total amount using specific denominations of currency, such as bills or coins, rather than a single numerical figure.
For example, if the total amount is 57 Bahraini Dinars (BHD), the system may display it as follows:
– 20 BHD (two 20 BHD notes)
– 10 BHD (one 10 BHD note)
– 5 BHD (one 5 BHD note)
– 1 BHD (two1 BHD notes)
This functionality assists users, such as cashiers or accountants, in easily identifying and counting the different denominations involved in the total amount. It promotes accurate cash handling, simplifies cash register reconciliation, and facilitates financial reporting.
- If the Funds Reconciliation Based on Currency Denominations is disabled, then the user must enter the default Opening Balance for Cashiers in Native Currency.
- If the user wants to update the opening balance, he must enable this policy:


Click on the update button,

Enter the count value for the cashier’s default balance.
Default Opening Balance For Cashiers in Native Currency:
Sets a standard starting cash amount for cashiers in the local currency, providing consistency and simplifying cash management.
Technical Settings
Please make sure to input the necessary measures for the technical setting and click on the save button located at the top right of the page in order to save and apply the changes.
Number of Copies Required for Each Invoice

Specifies how many copies of each invoice to print.
Technical Configuration

If the user enters a value of 10, it indicates that the system will refresh the connection status at regular intervals of 10 minutes.
Maximum Quantity Permissible Without Supervision

If a user exceeds the specified quantity limit, which is set at 10 in for example, they are required to obtain permission from a supervisor in order to add the 11th product to the invoice.
Maximum Allowed Discount

The maximum threshold for discounts that can be given on an invoice refers to the highest allowable amount or percentage of discount that can be applied to the total invoice value. This threshold sets a limit on the extent to which discounts can be granted. For example, if the maximum threshold for discounts is set at 50%, it means that the total discount applied to the invoice cannot exceed 50% of the invoice amount. Any discount beyond this threshold would require special approval or authorization.
Replacement Expiry Period

The number of days within which a credit note can be used refers to the specific time period during which a customer can utilize the credit note for a future purchase or as a form of payment. A credit note is typically issued by a business or retailer as a means of providing credit or compensation to a customer for a returned or canceled item. For example, a credit note may state that it is valid for 10 days from the date of issuance. This means that the customer has 10 days to utilize the credit note toward the purchase of another item or as a deduction from their invoice.
Refund Expiry Period

The number of days that a customer can return a product refers to the specific time period within which the customer is allowed to initiate a return request for a purchased item. This duration is typically outlined in the return policy of the business or retailer.
For example, if the return policy states that customers have 10 days to return a product, it means that the customer has a window of 10 days from the date of purchase to request a return. The return period may vary depending on the business and the type of product being sold.
Accepted Foreign Currencies

Select the Accepted Foreign Currencies. Please make sure to click on the save button located at the top right of the page in order to save and apply the changes.
Print Settings

Enter the Seller/location name and enter the TRN. Please make sure to click on the save button located at the top right of the page in order to save and apply the changes.
Currency Denomination
View and Update Your Currency Denominations for Unmatched Efficiency!
This page allows users to view and update the currency denominations used in the Point-of-Sales (POS) system for efficiency in transactions.

Note: The currency denominations can be added to the new currencies that don’t have a denomination or the existing denominations can be edited by clicking on the edit button.
When it’s a new currency the system will ask confirmation message
Click on the Add button.

Enter the monetary value and select the unit.
Note: For the unit- Make sure that the label and the label, subunit are present in the currency.
Barcode Setup
Supported Printers ( Zebra – All Models )
Supported Operating Systems ( Windows 7 / Windows 10 / Windows 11 – Macos )
Note: More supported printers & operating systems in the next release.
Note: You will need to download JS printer and install it
https://seenerp.com/documentation/js-printer-download/
Customize your barcode, First : Set the default Barcode Sticker Print Settings

Second, You add multiple sticker field and you can rearrange them


Add new barcode printer by clicking on “Add Printer” button:

Enter the printer name, Select the connection Type whether it is USB or Network:


If you choose “Network” You have to enter the IP address:

More than one printer can be added, set your default:

Please note that the following measures follow zebra printers unit of measurement : Dots per Millimeter (dpmm)

- Select the barcode type to be displayed.
- Select the barcode height and width
- Check box to select if the barcode number should be displayed or not.


Click on “preview” button the preview can be viewed to visualize how the layout of the barcode is.


Loyalty Program
This page allows you to configure and customize the points system for your loyalty program. You can set the base unit for points, currency denomination, and the currency equivalent for points. It also defines settings like the minimum redeemable points, bonus points for new customers, and automatically adjusts based on currency changes.

1. Base Unit for the Points:
Example: The base unit is always set to 1 and cannot be edited.
2. Base Currency Denomination for the Points:
Note: The below fields can be edited, after making the necessary changes, the user should click on the save button placed at the top left of the corner of the page to save the updates.
– The base currency denomination for points is based on the lowest currency unit. For example, in the case of the Bahraini Dinar (BHD), 1 BHD is used as the base currency for calculating points.
3. Currency Equivalent to Base Point:
– For example, in the Bahraini Dinar (BHD), 1 BHD equals 10 points. Since 1 BHD is made up of 1000 Fils, each point represents 100 Fils, linking the base point to the currency denomination.
4. Minimum Redeemable Points:
– This is the minimum number of points a customer must have to redeem them at the POS. For instance, if the minimum redeemable points are set to 50, the customer needs to have at least 5 BHD worth of points (50 points = 5 BHD) to redeem.
5. Bonus Points for New Customers:
– This defines the starting bonus points for new customers. If 10 bonus points are set, a new customer will receive 1 BHD worth of points (10 points = 1 BHD) during their first transaction.
Printers
Click on Add new printer:
Add printer information: Printer name and remarks

You can enable this button to adopt a paperless approach, allowing you to manage and share documents digitally instead of relying on printing. This helps reduce paper usage, cut costs, and enhance efficiency.
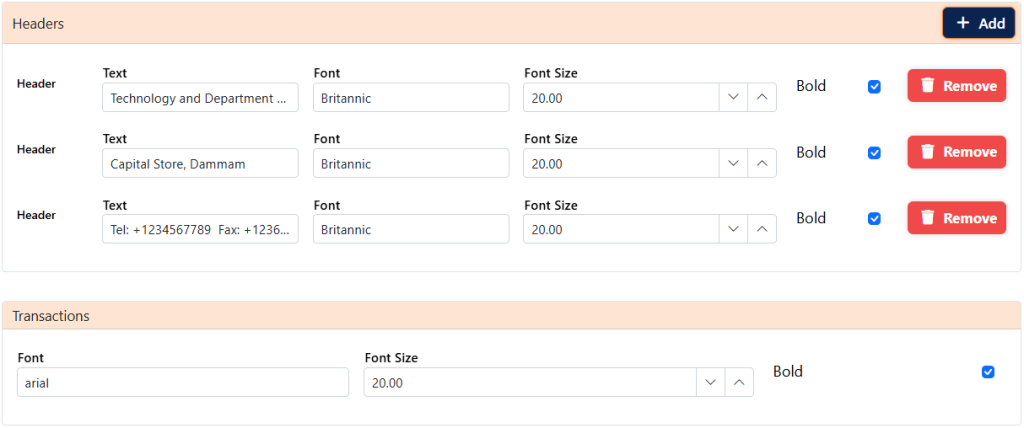

Machine
This page facilitates machine management, allowing you to view, edit, delete, and add machines to the system. To add a new machine click on the add new machine button.
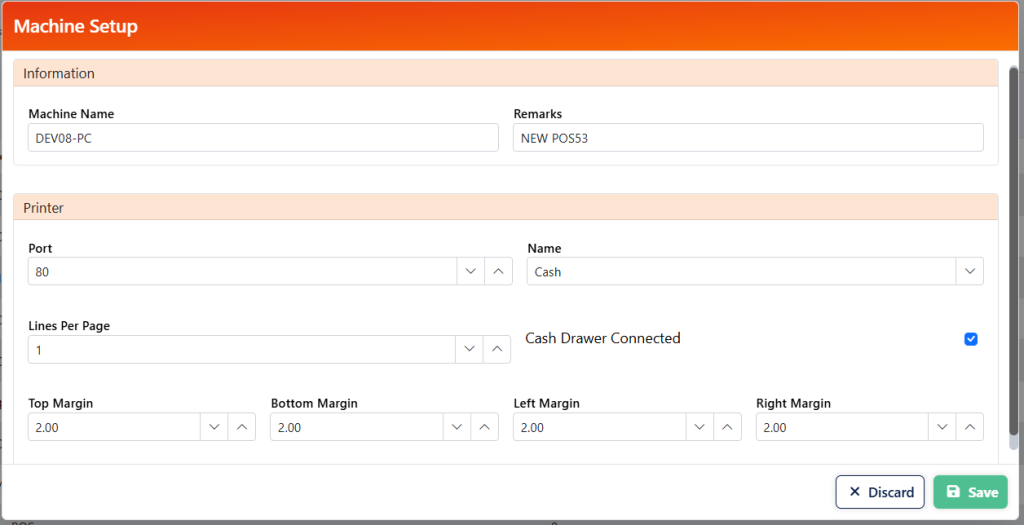
Information: Enter the Machine name and remarks.
Printer: Enter the port number, lines per page, select name of the printer and select if the cash drawer is connected to the printer.
Select top margin, bottom margin, left margin and right margin.
Modifying records:
To edit the record, double-click on the record and the system will display the form, make the necessary changes, and click on the save button.
