
Inventory
Suppliers
The suppliers page allows you to add, view, and manage supplier information, including contact details, banking info, and payment terms. You can also customize views and group supplier.
How to Create a New Supplier

- Enter the supplier’s general information: name, email ID, phone number, mobile number, address, website, tax registration number and Commercial registration number.
- Select the country.

- The “Active” button on the supplier page shows if a supplier is currently available for transactions. “Active” means the supplier can be used for new orders, while “Inactive” means they cannot, but their past records remain
- Select the currency
Managing Supplier Details:
- Double-click on a supplier record or click on the edit button to view details.

- Make necessary changes and click on the Update button.

- To delete a supplier “with permission” click on the Delete button.
Export Excel:

You can export suppliers by clicking on the Export to Excel button.
Customers
The customers page allows you to add, view, and manage customer information, including contact details, banking info, and payment terms. You can also customize views and group customers.
How to Create a New Customer
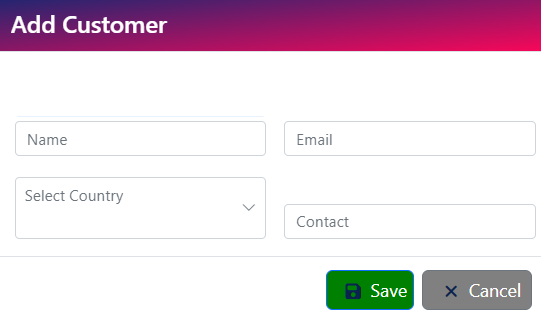
- Enter the customer’s name, email ID, select country and enter contact number
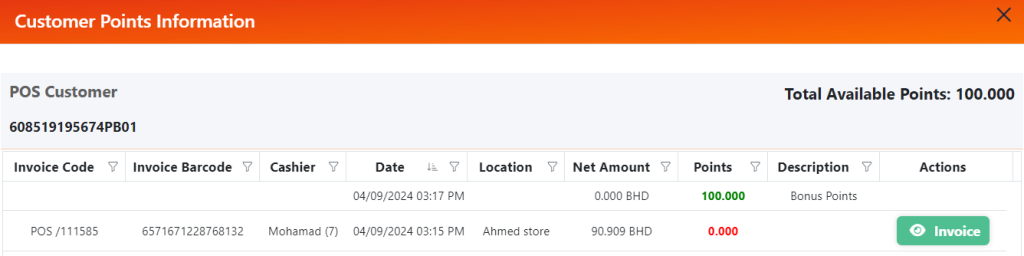
Managing Customer Details:

- Make necessary changes and click on the Update button.

- Click on the Eye button to view customers information:

Sales
Delivery Note
This page details the items being delivered to the customer, ensuring that the shipment matches the sales order and confirming receipt of the correct products.
Filtering and Sorting:

Click on the filter icon to open the filter, and enter the value to filter for or use the search bar to find the desired record.
The records can also be sorted in ascending and descending order of the desired field, simply double-click on the column that should be sorted.
Custom Grouping:

Drag the column to the bar to group the list by the column.


The system will display the information by groups.
How to Create a New Delivery Note
Customer :

Select the customer.
Location:

The Location to be targeted.
This cannot be edited once the product is selected.
Date:

Select the Date. Once the products are selected the date cannot be changed.
Currency:

Select the desired currency.
Tax policy:

Choose the desired taxation policy.
Discount Type:

the discount types are of 2 kinds, discount by each item or by the entire invoice.

If it’s by type then enter how much discount amount per product in the line.


but if it is a discount by invoice then enter the discount Percentage.
Description

Enter the desired description.
Products:
Click On Add Button and Enter the product code directly or select it from a dropdown search for available products.

Latest cost will be shown to provide up-to-date pricing information.
Book Quantity: Refers to the stock quantity in the chosen unit.
Average Cost: Represents the cost in the chosen unit.
Amount: The total amount before applying taxes and discounts.
Right-Click on a Line for More Actions:

The product Info displays Product Information Like Units, Suppliers, Stock and product history.
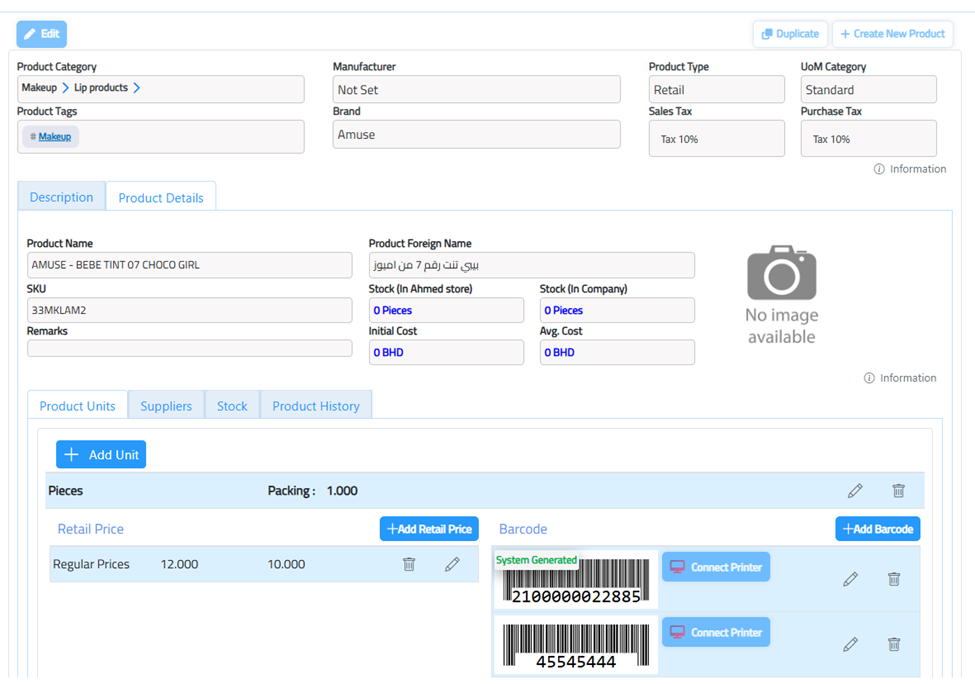
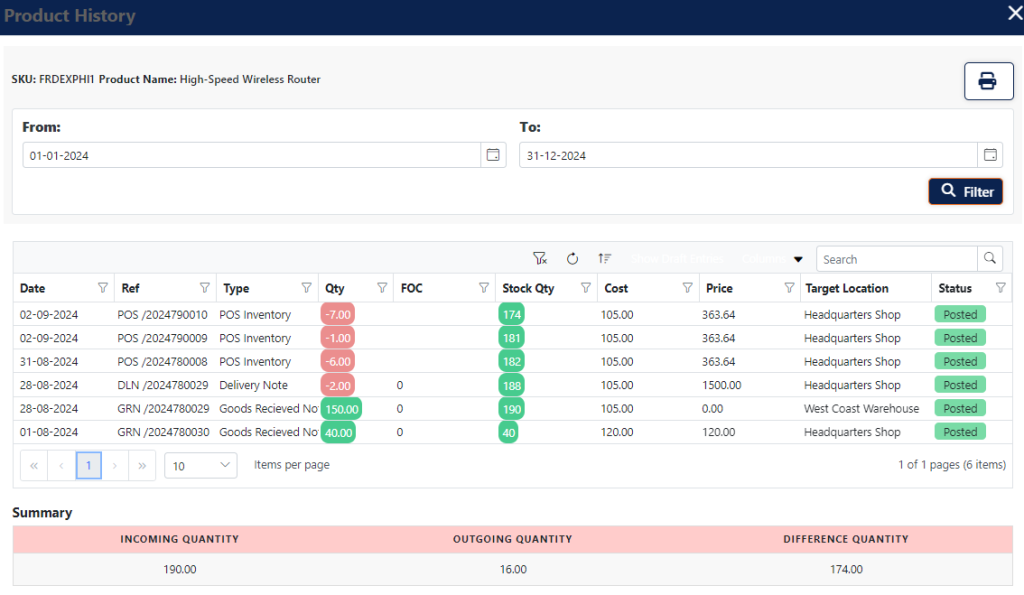
The Product History button displays all transactions for this particular product, including Incoming Quantity, Outgoing Quantity, and Difference Quantity.
Expiry Date:


If you select a product with an expiration date, a message will appear, you have to click “Get Barcode” to continue using the product.
Actions:
Logs: At the top of the screen, you will find the voucher history. This section lists all users that create, unpost , update, delete and reversed this entry, providing a comprehensive audit trail.


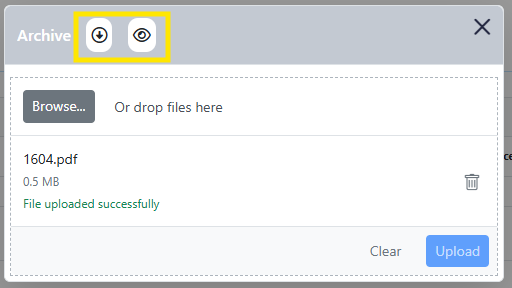
Archiving Documents: Archiving helps you store documents so you can find them easily.
After uploading the document, you can download and view the document by clicking the buttons,
| Click on the save button to create this Document. |  |
| Click on the delete button to delete the document. |  |
| Click on the Post button to Post this Document |  |
| Click the duplicate button to create a copy of the document. |  |
| Click on the print button to export the document in PDF form. |  |
| If the user has permission, click the unpost button to unpost the document. |  |
| You can create a sale return by clicking on Return Button |  |
Sales Return
This page is generated after the delivery note, if the customer returns any items. It manages the return process, adjusts inventory levels, and updates sales records to reflect the returned products.
Filtering and Sorting:

Click on the filter icon to open the filter, and enter the value to filter for or use the search bar to find the desired record.
The records can also be sorted in ascending and descending order of the desired field, simply double-click on the column that should be sorted.
Custom Grouping:

Drag the column to the bar to group the list by the column.


The system will display the information by groups.
How to Create a New Sales Return
Retrieving from Reference Option:

Search Button: Click the search button to retrieve from delivery note entered in the module.


View Reference: To view a reference before choosing it, click the eye button.
Customer:

Select the customer.

The Location to be targeted.
This cannot be edited once the product is selected.
These are the locations the user has access to under the current company.
Date:

Select the Date. Once the products are selected the date cannot be changed.
Currency:

Select the desired currency.
Tax policy:

Choose the desired taxation policy.

the discount types are of 2 kinds, discount by each item or by the entire invoice.

If it’s by type then enter how much discount amount per product in the table. And the system will do the calculations.

but if it is a discount by invoice then enter the discount Percentage

Enter the desired description.
Enter the product code directly or select it from a dropdown search for available products. Enter the returned qty.

Book Quantity: Refers to the stock quantity in the chosen unit.
Average Cost: Represents the cost in the chosen unit.
Amount: The total amount before applying taxes and discounts.
Right-Click on a Line for More Actions:

The product Info displays Product Information Like Units, Suppliers, Stock and product history.
The Product History button displays all transactions for this particular product, including Incoming Quantity, Outgoing Quantity, and Difference Quantity.
Once the products are selected, you cannot change the information below, Except : Discount, Tax and Description.

Actions:
Logs: At the top of the screen, you will find the voucher history. This section lists all users that create, unpost , update, delete and reversed this entry, providing a comprehensive audit trail.
Archiving Documents: Archiving helps you store documents so you can find them easily.
After uploading the document, you can download and view the document by clicking the buttons,
| Click on the save button to create this Document. | |
| Click on the delete button to delete the document. | |
| Click on the Post button to Post this Document | |
| Click the duplicate button to create a copy of the document. | |
| Click on the print button to export the document in PDF form. | |
| If the user has permission, click the unpost button to unpost the document. | |
POS Invoices
POS Invoices are created when the shifts are closed in the POS module and the Z reports are generated.
Filtering and Sorting:

Click on the filter icon to open the filter and enter the value to filter for or use the search bar to find the desired record.

The records can also be sorted in ascending and descending order of the desired field, double-click on the column that should be sorted.
Double-click on the invoice the view detail:

Note: Enabling the “Update Inventory Stock” policy in POS Profiles page ensures that with each invoice payment, inventory is updated. For example, if a product is sold, the system will immediately adjust the stock quantity. You can track product movement but no stock will be adjusted until the shift is closed and pos invoice is posted.

If you Enable “Auto Posting in POS” policy, invoices will be automatically posted after the shift is closed ( by printing Z report). Otherwise, the invoices will remain in Draft status until the user clicks on post button
Actions:
Logs: At the top of the screen, you will find the voucher history. This section lists all users that create, unpost , update, delete and reversed this entry, providing a comprehensive audit trail.
| Click on the Post button to create this Document. |  |
| Click on the print button to export the document in PDF form. |  |
| POS statement button will show all payments made, such as cash, credit card, and other payment methods used for that specific transaction. | |
| Click on the delete button to delete the document. |  |
| Click on the print button to export the document in PDF form. |  |
Purchases
Goods Received Notes
This page document the products that have been received from suppliers and confirm that the goods have been accepted into inventory.
Check out the tutorial below:
Filtering and Sorting:

Click on the filter icon to open the filter and enter the value to filter for or use the search bar to find the desired record.
The records can also be sorted in ascending and descending ord
er of the desired field, double-click on the column that should be sorted
How to Create a New goods received note
Supplier:

Select the supplier.
Location:

The Location to be targeted.
This cannot be edited once the product is selected.
These are the locations the user has access to under the current company.
Date:

Select the Date. Once the products are selected the date cannot be changed.
Currency:
Select the desired currency.

Tax policy:

Choose the desired taxation policy.
Invoice Number:

in this field you can enter invoice number.
Discount Type:

the discount types are of 2 kinds, discount by each item or by the entire invoice.

If it’s by type then enter how much discount amount per product in the table. And the system will do the calculations.

but if it is a discount by invoice then enter the discount Percentage
Description:
Enter the desired description.

Products:
Enter the product code directly or select it from a dropdown search for available products. Enter the received qty.


This means that the product you are trying to add does not exist in the list of products associated with the reference you retrieved, ensure that all products you add are already included in the referenced list.
Actions:
Logs: At the top of the screen, you will find the voucher history. This section lists all users that create, unpost , update, delete and reversed this entry, providing a comprehensive audit trail.
Archiving Documents: Archiving helps you store documents so you can find them easily.
After uploading the document, you can download and view the document by clicking the buttons,
| Click on the save button to create this Document. | |
| Click on the delete button to delete the document. | |
| Click on the Post button to Post this Document | |
| Click the duplicate button to create a copy of the document. | |
| Click on the print button to export the document in PDF form. | |
| If the user has permission, click the unpost button to unpost the document. | |
| You can create a purchase return by clicking on Return Button | |
| You can convert this GRN to a Bill, by clicking on Make Bill button |  |
Purchase Return
This page allows users to manage the return of products to suppliers. Users can select the supplier, add the items being returned, specify the quantities, and provide reasons for the return. The page also tracks the status of the return and provides options to approve, modify, or finalize the return process.
Filtering and Sorting:

Click on the filter icon to open the filter and enter the value to filter for or use the search bar to find the desired record.
The records can also be sorted in ascending and descending order of the desired field, double-click on the column that should be sorted.
How to Create a Purchase Return
Retrieving from Reference Option: Search Button: Click the search button to retrieve from Request for GRN entered in the module.


View Reference: To view a reference before choosing it, click the eye button.
Supplier:

Select the supplier.
Location:

The Location to be targeted.
This cannot be edited once the product is selected.
These are the locations the user has access to under the current company.
Date:

Select the Date. Once the products are selected the date cannot be changed.
Currency
Select the desired currency.

Tax policy:

Choose the desired taxation policy.
Discount Type:

the discount types are of 2 kinds, discount by each item or by the entire invoice.

If it’s by type then enter how much discount amount per product in the table. And the system will do the calculations.

but if it is a discount by invoice then enter the discount Percentage
Description:
Enter the desired description.

Products:
Enter the product code directly or select it from a dropdown search for available products. Enter the returned qty.
Latest cost will be shown to provide up-to-date pricing information.


This means that the product you are trying to add does not exist in the list of products associated with the reference you retrieved, ensure that all products you add are already included in the referenced list.
Right-Click on a Line for More Actions:

The product Info displays Product Information Like Units, Suppliers, Stock and product history.
The Product History button displays all transactions for this particular product, including Incoming Quantity, Outgoing Quantity, and Difference Quantity.
Actions:
Logs: At the top of the screen, you will find the voucher history. This section lists all users that create, unpost , update, delete and reversed this entry, providing a comprehensive audit trail.
Archiving Documents: Archiving helps you store documents so you can find them easily.
After uploading the document, you can download and view the document by clicking the buttons,
| Click on the delete button to delete the document. | |
| Click on the Post button to Post this Document | |
| Click on the print button to export the document in PDF form. | |
| If the user has permission, click the unpost button to unpost the document. | |
Adjustment
Inventory adjustment helps to correct stock levels when there missing items or damaged goods. It ensures that the numbers in the system match the actual items available. It helps businesses avoid running out of stock or having too much, and keeps everything accurate for financial records.
Filtering and Sorting:

Click on the filter icon to open the filter, and enter the value to filter for or use the search bar to find the desired record.
The records can also be sorted in ascending and descending order of the desired field, double-click on the column that should be sorted.
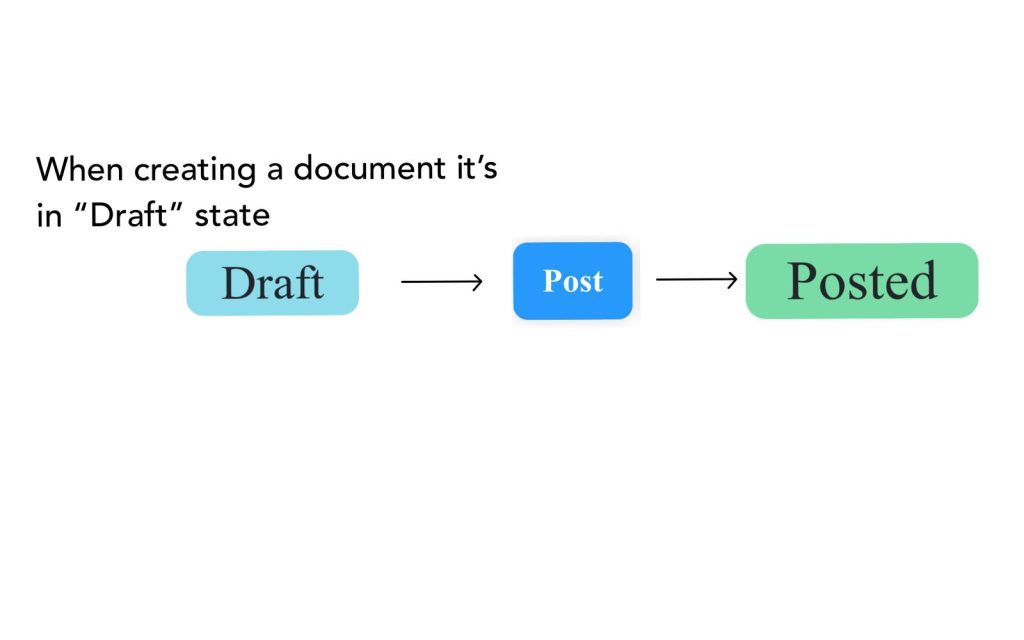
Flow of Document Status
Create a New Adjustment
First, Choose the reason for adjustment:
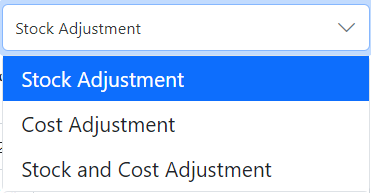
- Stock Adjustment: Record the actual quantity of items.
- Cost Adjustment: Update the cost of items while keeping the stock quantity unchanged.
- Cost and Stock Adjustment: Modify both the cost and the stock quantity.
Select the target location.

Select the date.

Write a description.

If Stock adjustment reason is selected:


the quantity field will be open for modification, while the cost field remains closed.
If Cost adjustment reason is selected:


if you choose the reason “Cost Adjustment”, only the cost field will be editable, while other fields like quantity will be locked
Note: Fields depends on the reason setup you have configured in the setup page.
Actions:
Logs: At the top of the screen, you will find the voucher history. This section lists all users that create, unpost , update, delete and reversed this entry, providing a comprehensive audit trail.
| If the voucher is in draft status, the user can post it. |  |
| Click on the delete button to delete the document. |  |
| Click on the print button to export the document in PDF form. |  |