Administration
The Administration section in an ERP system plays a vital role in managing the core configuration and operational settings of the company. It oversees tasks like company setup, defining policies, managing messaging credentials, and configuring electronic signatures. Additionally, it includes tools like a report designer for customizing reports and handles user and role management to ensure proper access control and smooth operations across the system
Company Setup
This page allows you to configure essential business information, such as your company’s name, logo, contact details, tax, languages and manage accounts.
General Information:
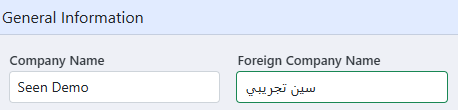
The Company name should be written in the main language.
Foreign company name should be written in a second language.
Contact Information:
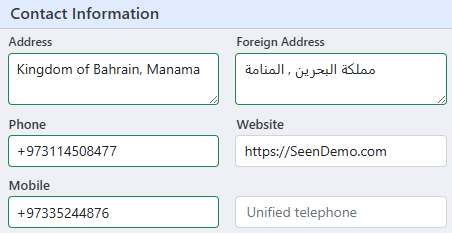
Address should be written in the main language.
Foreign address – the address of the company should be written in a second language.
Enter Phone number, website, mobile number and Unified telephone number
The above fields can be edited and displayed in the printed reports.
To Upload image:

Click on the image.
Then a pop-up dialogue box will appear, user can select to browse or drag & drop the image to be uploaded.
The uploaded image will be displayed in the printed reports.


Legal information:

Enter the Registration and tax registration number and click save on the top right corner of the page.
Localization Settings:
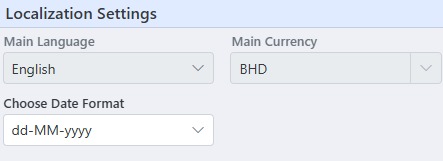
The main currency cannot be changed, it is set in the wizard when the company is created. When the user doesn’t select a currency, the system will take the main currency as the default currency.
Changing the Date format changes the date format in every place it’s used.
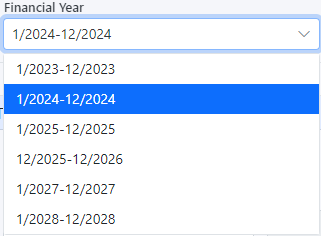
Financial Year:
Financial year drop down allows you to select the financial year that was previously added in the accounting module in setup page, This helps to align you financial reports with the correct accounting period
Configuration :
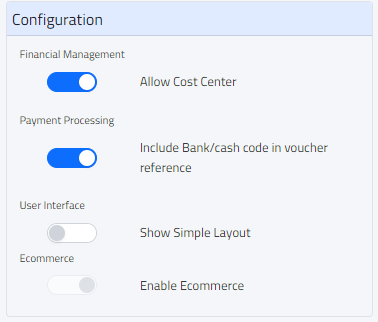
- Allow Cost Center: allow user to add and use multiple cost centers.
- Include Bank/cash code in voucher reference: every voucher will have the bank or cash code in its reference.
If you disable this option, the voucher code will depend on the type of voucher instead.
- Show Simple Layout: when you enable this, the design of the system will change from this layout
To this simple layout
- Enable Ecommerce: when enabled, customers can purchase products directly from your website, integrating with payment gateways for transactions
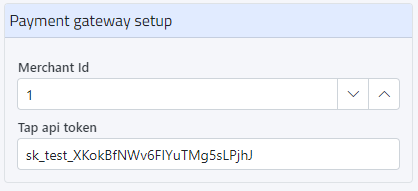
Payment Getaway Setup:
If you have an enterprise plan integrated with e-commerce, you need to contact Tap Payments to set up your account. They will provide you with your merchant ID and Tap API token.
You can view all your payments on the Tap website. If you need further assistance, feel free to contact us.
Taxation Policy:
The tax can be enabled and disabled:
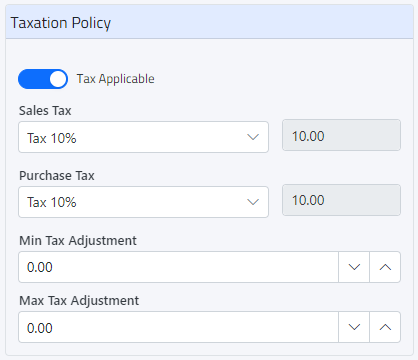
You can also set Minimum and Maximum tax adjustment
Social Media Accounts:
Enter the social media site and choose social media type

Inventory Policies
Inventory policies page contains settings that directly affect how you inventory is managed, you can enable and disable specific policies below.
Goods Received Notes
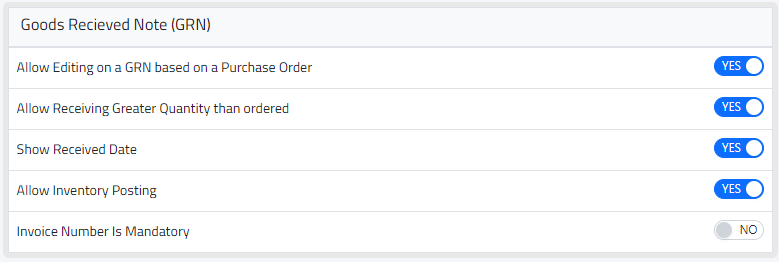
Allow Editing on a GRN based on a Purchase Order:
is to Allow the user to edit the good receiving notes based on the purchase order.
Allow Receiving Greater Quantity than Ordered:
This is to allow a greater quantity of stock than the Purchase order to be received.
Show Received Date:
Display the received date on the GRN
Allow Inventory Posting:
Enable the user to post GRN’s from the inventory/ retailing module.
Invoice Number is Mandatory:
This policy requires that every invoice must have a unique invoice number. This ensures proper tracking and record-keeping for each transaction.
Purchase Order

Allow UnApprove:
To allow the purchase order to be unapproved.
Representative Required:
If this is checked then a representative is required to create a purchase order.
Delivery Order
Landing Cost Calculation Methods
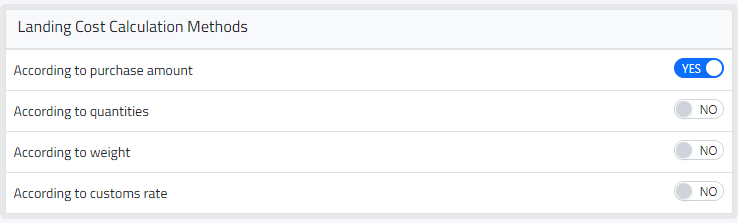
You need to choose one of the following landing cost calculation methods:
- According to purchase amount
- According to quantities
- According to weight
- According to customs rate
Products
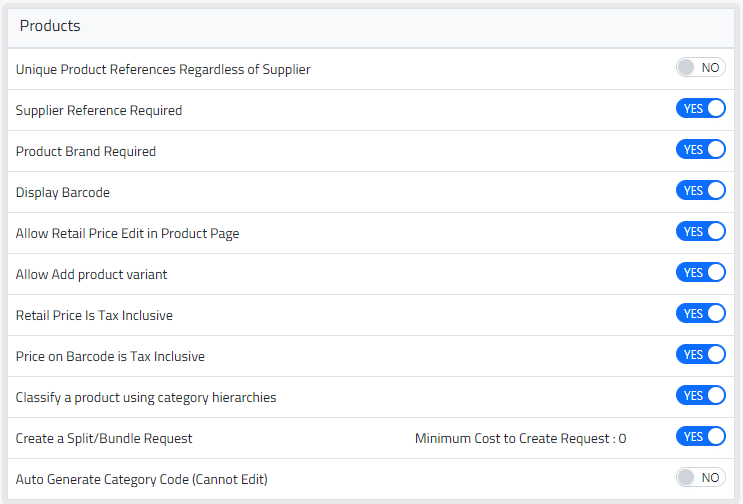
Unique Product References Regardless of the Supplier:
This makes the products have a unique reference even when they are under the same Supplier.
Supplier Reference Required:
This ensures that product must have a supplier reference.
Product Brand Required:
The user must select a brand for the product.
Display Barcode:
Shows the barcode and allows users to be able to create and edit barcodes.
Allow Price Update:
Allows the user to edit the retail price of each product on the product detail page.
Allow Add product variant:
Allows the user to be able to create a new product with variants.
Retail price Is Tax inclusive :
This policy means that the retail price shown for products already includes taxes. Customers see the final price with tax included.
Price on Barcode is Tax inclusive:
When this is enabled, the price printed on the barcode label includes tax. This helps ensure the price scanned at checkout matches what’s shown on the product.
Classify a product using category hierarchies:
This policy helps organize products by placing them into categories and subcategories. This makes it easier to manage and find products.
Create a Split/Bundle Request:

This policy allows you to request the splitting or bundling of inventory items. For such requests to be processed, there must be a minimum cost set.
Auto Generate Category Code ( Cannot Edit):
This policy automatically creates category codes for products and prevents any manual changes to these codes. This ensures consistent and unique codes for each category.
Internal Transfers

Uses Custom Route:
Enable the transfer to use a custom route made in the custom route setup.
Must Follow Entire Custom Route:
The transfer must follow the entire custom route.
General
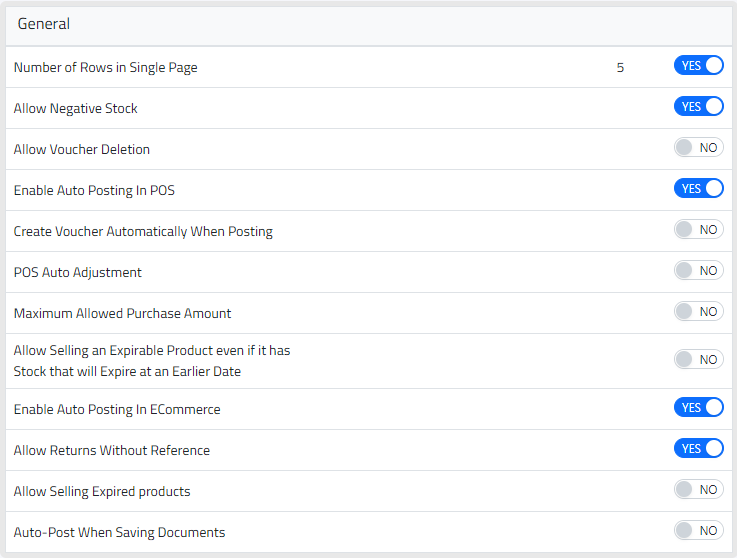
Number of Rows in Single Page:
Double click on the number to increase/ decrease it
This setting determines how many rows of data (like items in a list) are displayed on a single page. Adjusting this can help with viewing large records or reports. If your internet speed is slow, you can decrease the number of rows to improve loading times.
When enabled, the system allows you to process sales even if the stock goes negative, you can sell items even if inventory shows you don’t have enough in stock.
Allow Voucher Deletion:
This policy enables the user to be able to delete a voucher. (Normally this is not checked to ensure maximum security and prevent data manipulation.)
This automatically posts transactions in the POS system without the need for manual recording. It streamlines the process by automatically finalizing transactions.
Create Voucher Automatically when posting:
This policy enables the system to create a voucher automatically when posting.
POS Auto Adjustment:
Create automatic adjustments on the POS module.
Maximum Allowed Purchase Amount:
makes the maximum allowed purchase quantity equal to 150.
Allow selling an Expirable product:
This allows the products to be sold even if it’s expired, the expiry date is ignored.
Enable Auto post in ECommerce:
This policy automatically updates your eCommerce platform with any changes made in your inventory system. This ensures that inventory adjustments, stock levels, and other updates are reflected in your online store without manual input.
Allow Returns Without Reference:
When enabled, users can process returns without the need to retrieve the original sale or purchase, allowing you to either retrieve by reference or create a new return directly.
Allow Selling Expired products:
This allows the sale of products even if they have passed their expiration date
Auto-Post When Saving Documents:
When this policy is enabled, documents are automatically posted as soon as they’re saved. This eliminates the need to manually click “save” and then “post,” making the process quicker and more efficient.
Delivery Note

If you enable this policy, you can edit or add products to the delivery note even after it has been created, based on the related sale order. This means you can adjust the delivery details to ensure they align with the sale order.
Messaging Credentials
This page facilitates managing the credentials of your messaging services
First, Enable the Credentials Policies:


Setup
Signatures
This page allows you to add a signature to any report in the system. This feature ensures reports are authenticated or approved, providing an official stamp of authorization.
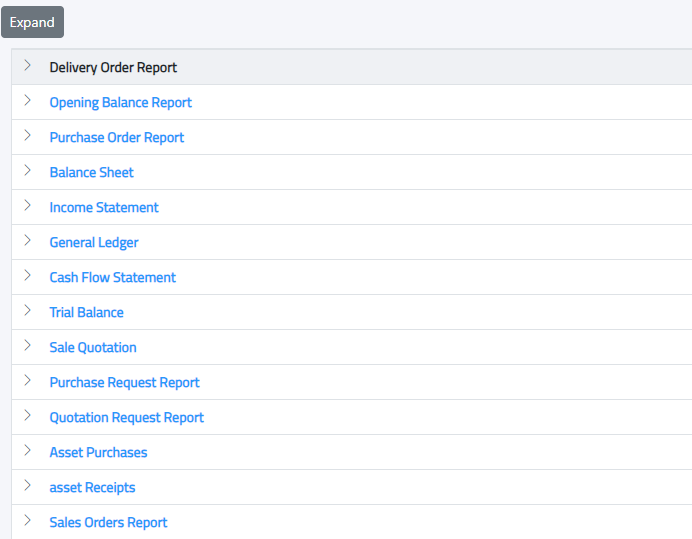
Click on Expand Button to view all signatures

Add new signature:
Enter the signature in the Name field and choose the role.
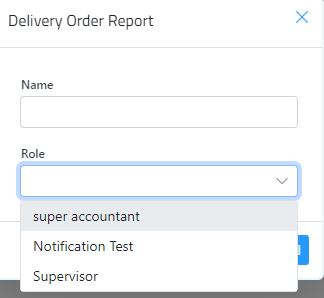
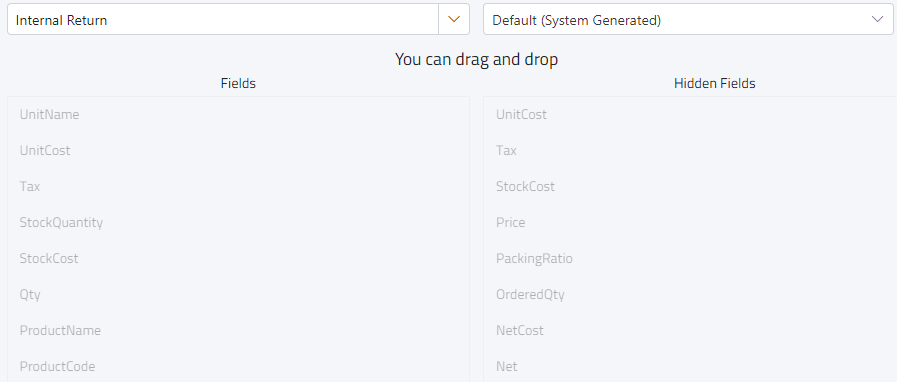
Report Designer
This page allows you to customize reports by selecting any report and choosing a template. You can control what information will be shown or hidden in the report, tailoring the layout and content to fit your needs. This helps create more relevant and focused reports for analysis or presentation.
First, you have to choose a report from the drop down search

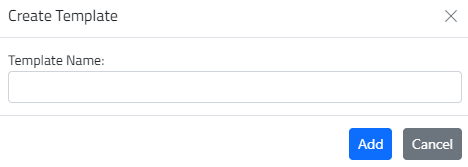
Then, Select a template OR you can add new template by clicking on “add new template” button

Template Setting:

Click on the setting button to change template view setting, if you want to change the view from landscape to portrait just click on the button:
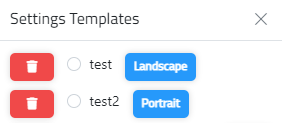
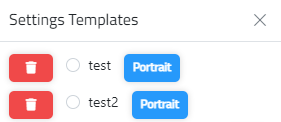
Landscape view displays the report in a wider format (horizontal)
Portrait view shows it in a taller format (vertical).
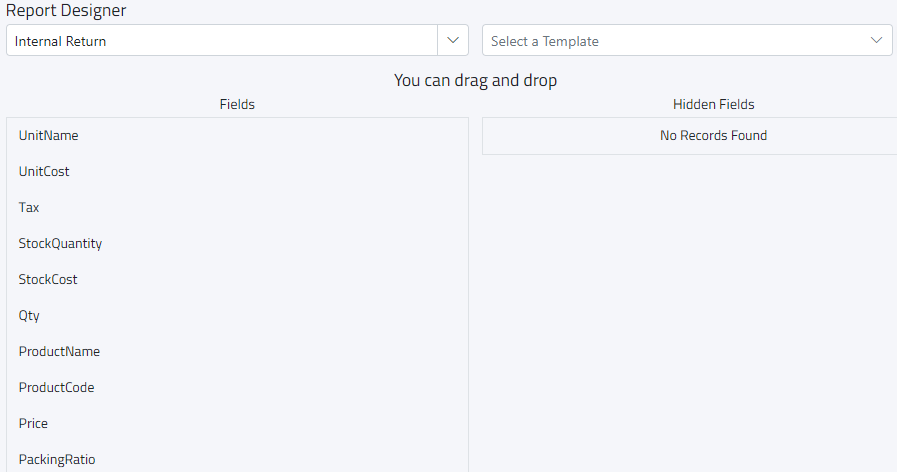
You can design your own reports by drag and drop the fields that you want it to be hidden:
Document Type setting
This page allows you to create or edit additional terms on all documents in the system. When you add an additional term or description, it will appear in the selected documents.
Purchase Order document selected from drop down search
Click on the Edit button

Write the desired additional term and description:
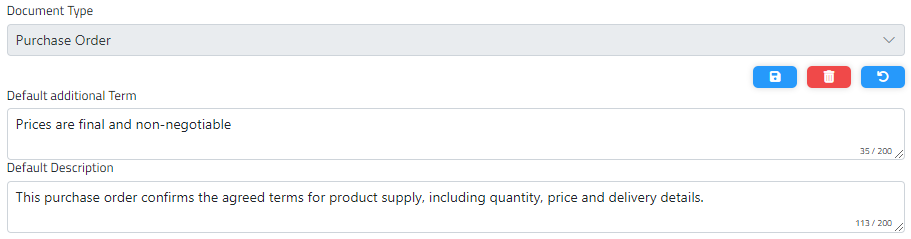

Click on the save button

You can delete the current document type setting by clicking on the delete button

Use the Undo/Reset/Cancel button to revert changes.
Administration
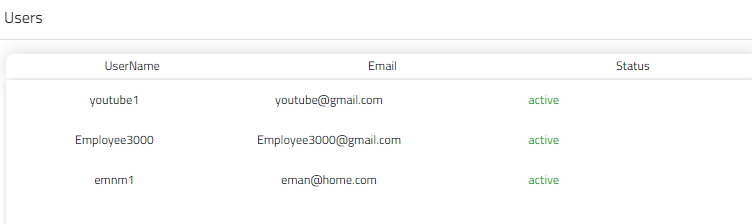
Users
The Users page in the administration section is designed for managing user accounts and their statuses within the system
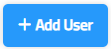
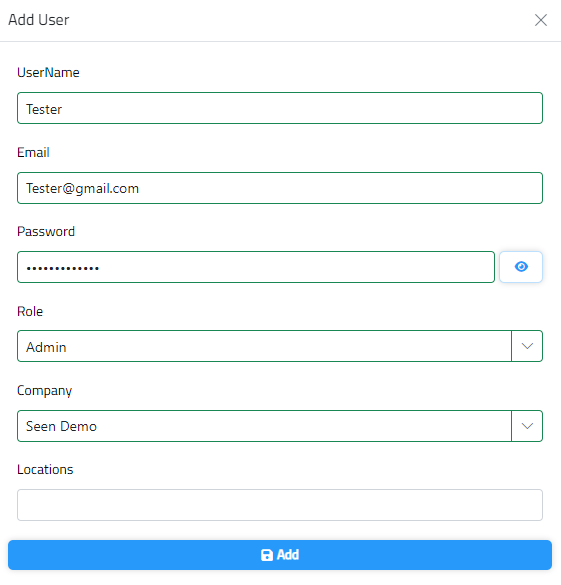
How to Add a New User
Enter the Employee Name, Email, Phone Number, UserName, Password and Company:
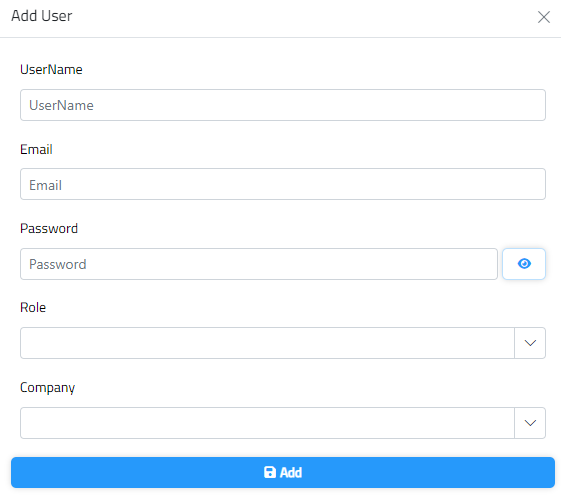
After choosing the company, you have to select locations.
The system will automatically create A unique user id for each user

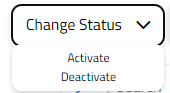
Click on the checkbox to Activate or Deactivate the user. The status of the user will change

When you click the Expand button, it reveals detailed information about each user. Specifically:

- Company: Displays the company or organization the user is associated with.
- Locations: Lists the specific locations (e.g., branches or offices) that the user has access to within the company.
- Roles: Shows the roles assigned to the user, defining their permissions and access levels within the system.
Double-click on a specific role to view details.
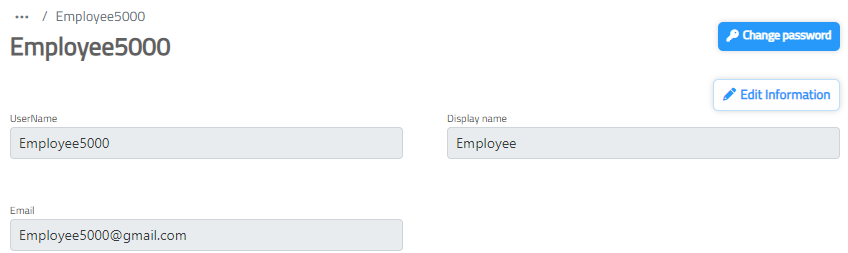
You can edit user information and change the user password.
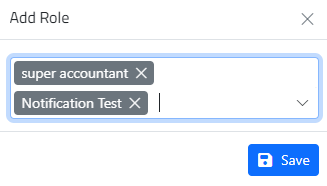
Select the “Role” tab. If you want to add a new role, You can add multiple roles at once if needed.
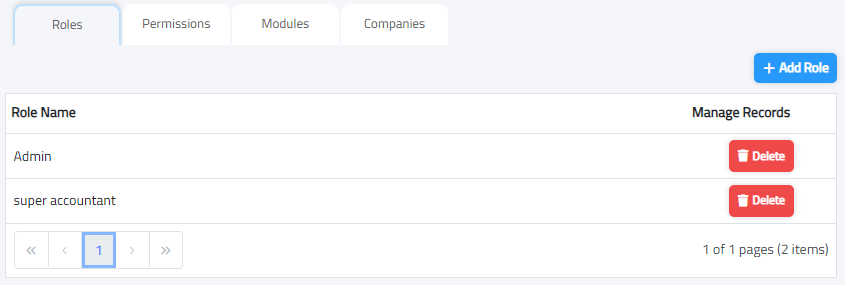
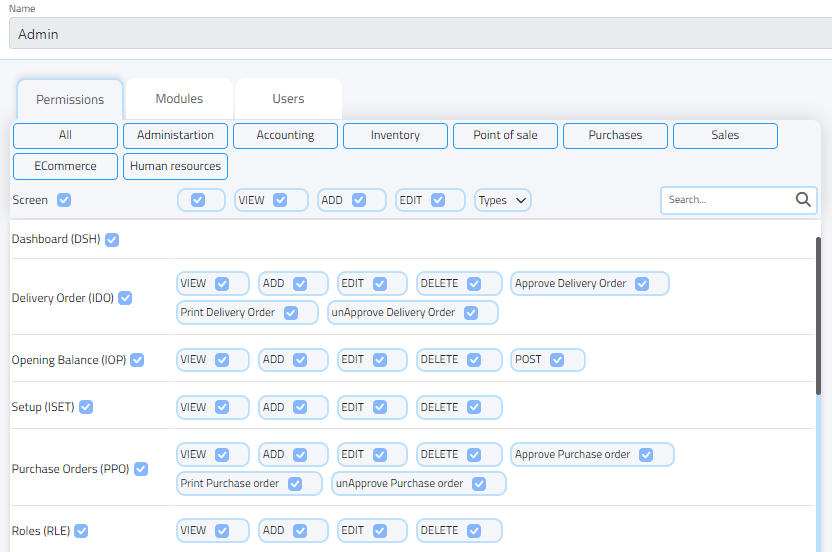
Select “Permission” tab. Here, you can view and assign permissions to the user associated with the selected role.
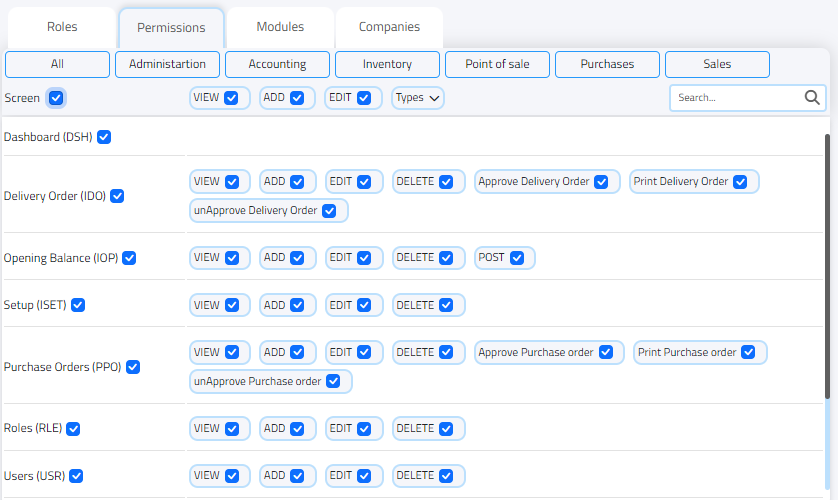
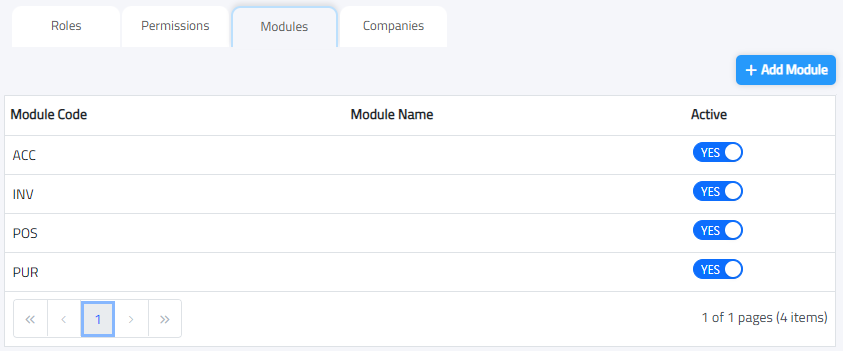
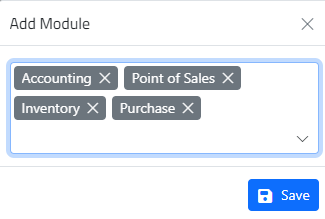
Select “Module” tab. This allows you to add or choose modules that the user can access based on their role.
Select ” Companies” Tab to link Companies and Locations:
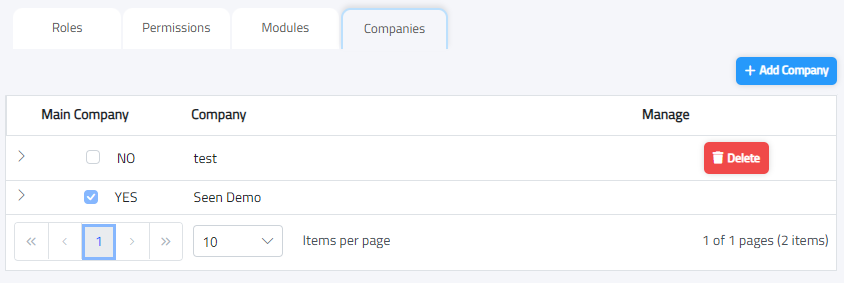
Click on the checkbox to set the company as main company ” Default “
Add New Location:
Click on the Expand button to view all locations linked with this company.
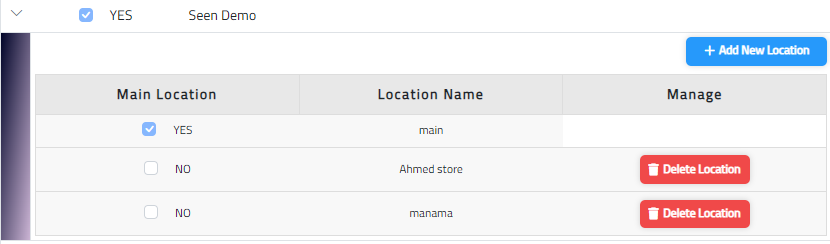
Note: You cant delete a main location until you uncheck the ” Main Location ” Box.
Roles
Effortlessly Manage User Roles: Easily create, delete, or assign roles to manage user permissions within the system.
How to Add a New role
Click on ” Add Role ” button to add new role:

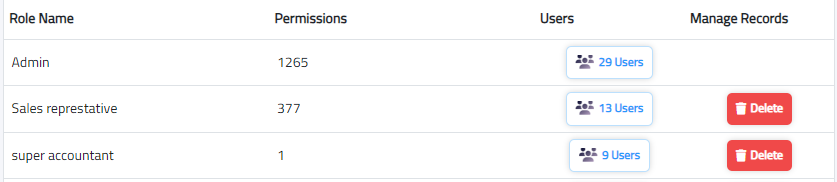
Role Name: The name of the role
Permissions: Number of permissions assigned to the role.
Users: Number of users assigned to the role.
Double Click on “Users” to View users details:

Double click on specific Role to assign permissions, modules and add users.