
General Ledger
Opening Balance
This page shows the initial balance of an account at the start of a financial period. It reflects the amount carried forward from the previous period and is used as a starting point for tracking transactions and calculating the current balance. It ensures that the account balances are accurate from the beginning of the period.
Sorting:

Click on the column header to sort the records in ascending or descending order.
Flow of Document Status

Create a new Opening Balance

Enter the reference number.

Select the Accounting Date.

Select the Cost Center.

Enter the Description of the bill entry.
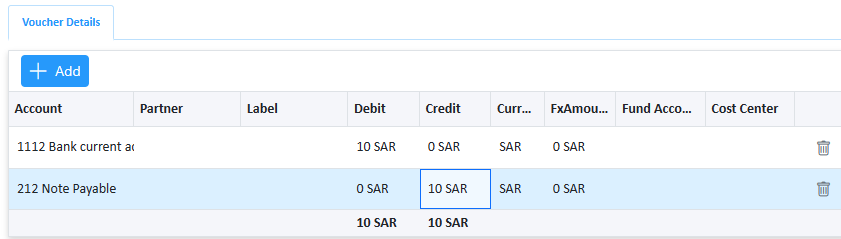
Input the Voucher details.
Select the Voucher details tab.

Click on the add button to add a voucher record.

Actions:
| clicking on post button updates the account balances, and creates the journal entries. | |
| The system will convert the document to a PDF for printing | |
| Click the duplicate button to create a copy of the document. | |
| View the history of changes made to this document. | |
| If the user has permission, click the delete button to delete the document. |  |
| Click the Excel export button to export the document in Excel format. |  |
| Use the navigation buttons in the top right corner to move to other documents. |  |
| Documents can be archived by clicking the archive button. |  |
| The receipt voucher can be directly approved by clicking the approve button |  |
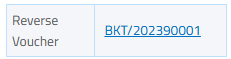
Reversing Voucher:

To reverse a voucher, click the reverse button located in the top right corner of the page.
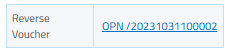

Reversed documents will display a reference number indicating they have been reversed.
Account Statement
This page provides a detailed summary of all transactions and activity within a specific account over a given period. It includes debits, credits, and the resulting balance. It helps track the account’s financial activity and verify the accuracy of transactions and balances.
The general ledger can be filtered by:
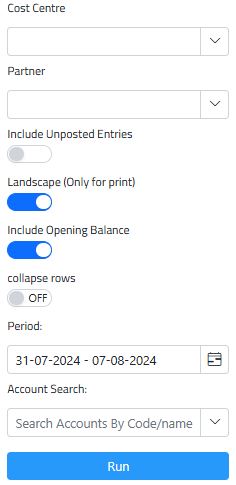
- Cost Centers:
Search and filter transactions by specific cost centers to track expenses and revenues associated with different departments or projects
2. Partners:
Allows you to view transactions related to various partners, including:
– Sales/Purchase Representatives
– Drivers
– Customers
– Suppliers
– Employees
3. Include Unposted Entries
Shows all posted transactions along with draft (unposted) entries.
4. Landscape (Only for print)
The document will be printed with the wider page, This is useful for fitting wide tables or charts on a single page when printing.
5. Include Opening Balance:

Displays the opening balance for each account to review the starting amount for the selected period.
6. Collapse Rows:
Lets you collapse rows to streamline the view and reduce clutter, making it easier to navigate through the data.
7. Select Period:
Filter the statement to show transactions for a specific period.
8. Select Account:
Filter the statement to display transactions for a particular account. If no specific account is selected, all accounts will be shown.
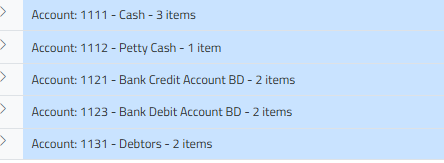
Accounts View:

The Vouchers are grouped by the Accounts.
Filtering:
On each Column:

Filtering: Click on the filter icon to open the filter and enter the value to filter for or use the search bar to find the desired record.
Exporting Document:
The general ledger can be exported in two formats-

Excel, or directly printed as a PDF report.
The system will convert the data to the format and export it.
Closing Balance
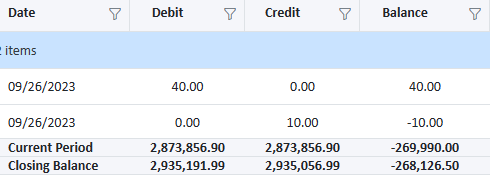
The system shows the total of the debit, credit, and balance amounts for the period of data displayed and the closing balance.
Double-click on the record will show you the details page
Journal Entries
This page records all individual transactions made within the accounting system. Each entry includes details such as the date, account debited, account credited, amounts, and a description of the transaction. It serves as the detailed record of all financial activities for maintaining accurate financial records and preparing financial statements.
Filtering & Sorting:
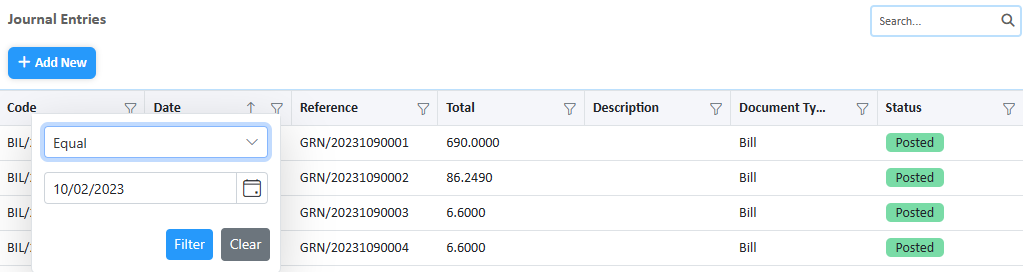
Filtering: Click on the filter icon to open the filter and enter the value to filter for or use the search bar to find the desired record.
Sorting: Click on the column header to sort the records in ascending or descending order.
Create a new Journal entry

Enter the reference number.

Select the Accounting Date.

Select the Cost Center.

Enter the Description of the bill entry.

Write the Desired comments.
Input the Voucher details.
Select the Voucher details tab.

Click on the add button to add a voucher record.


Select the Account.
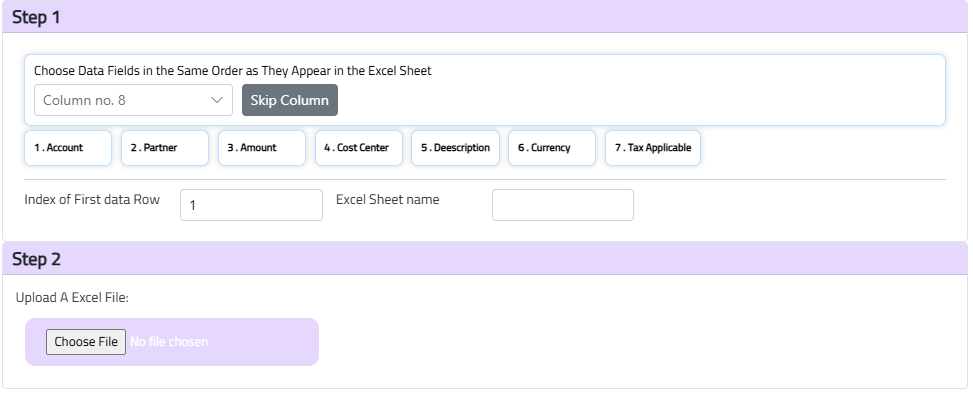
Import Excel:
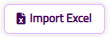
By clicking this button, you will be directed to a page where you can select data fields from an Excel file to import into the system.
Actions:
| clicking on post button updates the account balances, and creates the journal entries. | |
| The system will convert the document to a PDF for printing | |
| Click the duplicate button to create a copy of the document. | |
| View the history of changes made to this document. | |
| If the user has permission, click the delete button to delete the document. | |
| Click the Excel export button to export the document in Excel format. | |
| Use the navigation buttons in the top right corner to move to other documents. | |
| Documents can be archived by clicking the archive button. | |
| The receipt voucher can be directly approved by clicking the approve button | |
| Posted documents can be edited by first unposting the document, making the necessary edits, and then reposting it. |  |
Reversing Voucher:

To reverse a voucher, click the reverse button located in the top right corner of the page.
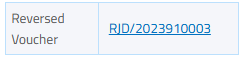
Reversed documents will display a reference number indicating they have been reversed.
Note: For different currencies, ensure the currency exchange account is set up in the chart of accounts.

Ensure the default chart of accounts has the exchange gain and loss accounts selected in the company settings page. The system will automatically calculate the rates based on the rates set in the currencies page in the setup.
Note: The document must be balanced. If the total amount of all lines does not match the entered amount, the document will not be posted, and an error message will appear.

If the lines exceed the voucher amount, the system will reduce the amount entered automatically.
Preview of voucher:

Before you finalize the voucher, the system displays a preview of the voucher that will be created. This preview typically shows the debit and credit accounts.